


Causes and Hazards of Air Pollution
Air pollution has become a major environmental cause of death (excerpt from People’s Daily Online, 2014.05.25)
On May 21, 2014, the Organisation for Economic Co-operation and Development (OECD) released its latest assessment of the costs of air pollution: “Outdoor air pollution causes 3.5 million deaths worldwide each year, resulting in annual health costs of as much as 3.5 trillion US dollars.
China accounts for approximately 1.2 million of these deaths, or two-fifths of the total, and suffers economic losses of approximately 1.4 trillion US dollars per year.”
The World Health Organization confirms:
68% of human diseases are associated with air pollution
Cause 1: Indoor air can be more than five times, and even up to 600 times, more polluted than outdoor air
- Harmful substances outdoors, such as PM2.5, sulfur oxides, pathogens and pollen, can enter indoors through doors and windows at any time
- Interior decoration materials, paint and furniture continuously release toxic gases such as formaldehyde, benzene and xylene
- Indoor secondhand smoke and cooking fumes
- Carbon dioxide can easily exceed safe levels in enclosed rooms, causing severe oxygen depletion
- Bacteria, fungal spores and other microorganisms are more likely to grow indoors than outdoors
Cause 2: More than 90% of people spend over two-thirds of their time indoors, breathing polluted air
Cause 3: Breathing polluted air may not cause immediate illness, but inhaled harmful substances can accumulate in the body over time
- People consume about 6 kg of water and food each day. Consuming contaminated water or food can cause various symptoms immediately
- People breathe about 18 kg of air each day. Harmful substances inhaled can accumulate in the body over time, making air pollution a hidden threat to human health
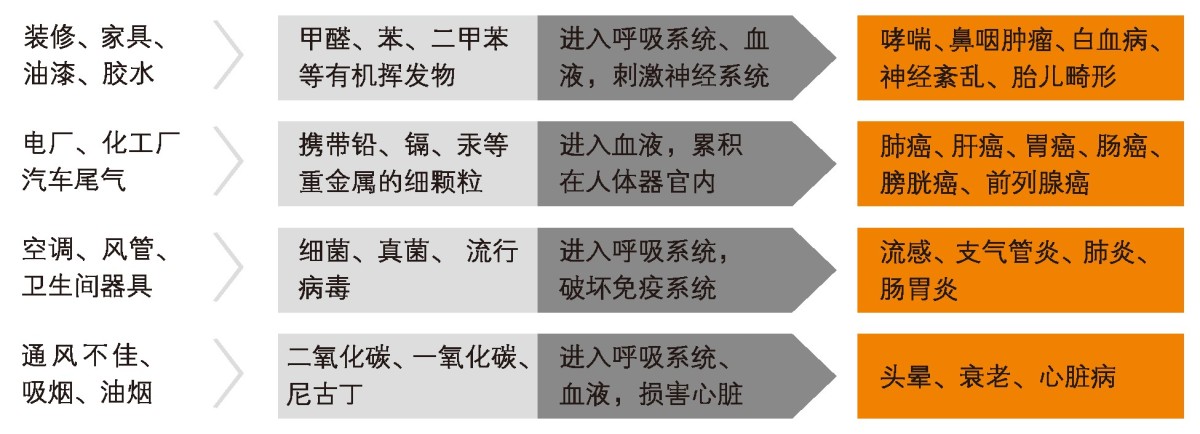
Effects of Indoor Air Pollution on Human Health
How to Purify Indoor Air
Common Misconceptions About Indoor Air Purification
Misconception 1: Opening Windows for Ventilation
Opening windows can reduce indoor concentrations of formaldehyde, benzene and other volatile organic compounds to some extent and keep the air fresh. However, it also brings indoor dust particles of various sizes, sulfur oxides, pathogens, pollen and other pollutants from outdoors
Misconception 2: Placing Plants Indoors
Green plants can absorb certain harmful gases, but the amount absorbed is negligible and the gases decompose very slowly. Plants also release a considerable amount of carbon dioxide, so their ability to purify the air is very limited. They can also easily become breeding grounds for bacteria
Misconception 3: Installing a Traditional Fresh Air System
Most traditional fresh air systems have only coarse filters. They provide ventilation but do not purify indoor air. Dust and bacteria accumulating inside the unit may instead cause secondary indoor air pollution
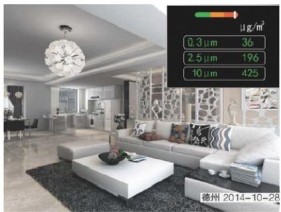

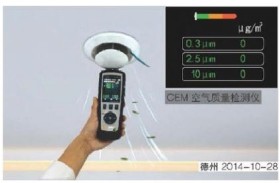
Ways to Purify Indoor Air
Method 1: Keep Doors and Windows Closed and Use an Air Purifier
Keeping doors and windows closed while using an air purifier can effectively purify indoor air. However, keeping them closed for extended periods can cause severe oxygen depletion indoors and may easily trigger cardiovascular and cerebrovascular diseases, making it necessary to open the windows for ventilation. An air purifier can only provide temporary relief from air pollution!
Method 2: Install a Fresh Air System That Effectively Filters PM2.5
A fresh air system is the solution to indoor air pollution. It continuously supplies clean outdoor air while exhausting polluted indoor air.
- Fresh air passes through coarse, medium and high-efficiency filtration stages, filtering
99 .9% of PM2.5, keeping indoor PM2.5 concentrations more than 50–200 times lower than outdoors
Fresh air is continuously supplied to every room to meet indoor oxygen needs, while 100% of dust, formaldehyde, benzene and other harmful substances in indoor air are exhausted outdoors
Solutions to Air Pollution
Fresh Air System Comparison
System Selection and Design
■ Determining the Fresh Air Volume
Fresh air load calculations have traditionally been based on “air changes per hour relative to room volume” or “airflow per person.” This can overlook actual ventilation effectiveness and fresh air utilization efficiency. A scientific calculation should be based on the “fresh air velocity across the airflow section,” with indoor occupancy density also taken into account. (“Airflow section” refers to the indoor cross-section, height × width, along the fresh air path.) Based on our many years of experience with GreeDe fresh air projects, we have established the following reference data:
Reference table for fresh air velocity across the airflow section: m/h (also expressed as metres per hour)
Example: A classroom is 10 × 6 × 3 m (length × width × height).
Fresh air is supplied at a high level on one side of the classroom, and return air is extracted at a low level on the other side. The calculation is: 6 × 3 × 25 = 450 m³/h. A 500 m³/h fresh air unit can be selected to supply the classroom.
■ Equipment Location
● Locate the equipment near an exterior wall to facilitate the intake of fresh outdoor air, exhaust of polluted indoor air and drainage of condensate;
● Do not install the equipment outdoors; keep it away from rain;
● Allow sufficient space to open the equipment for maintenance;
Keep the air intake away from range hoods, rubbish heaps, drainage channels, outdoor air-conditioning units and other sources of pollution.
Keep the distance between the fresh air inlet and exhaust outlet at least 0.6 m to prevent recirculation
Install the total heat exchanger where the required duct runs are shortest to reduce duct resistance
Avoid unnecessary bends and keep the fresh air duct as short as possible
Install a power connection point near the fresh air unit
■ Duct Design Considerations
● Keep duct air velocity between 2–4m/s. Calculate a suitable duct diameter based on airflow and velocity: airflow = velocity × duct cross-sectional area;
● Depending on site conditions, round PVC or rectangular ducts may be used. Apply insulation material >10mm thick to outdoor ductwork;
● Route ducts along walls and avoid sharp bends and sudden changes in diameter;
● Place fresh air outlets in areas where people spend extended periods, and extend fresh air ducts as far into each room as possible;
● Fresh air outlets and air-conditioning outlets should be separate and should not be combined;
● Keep exhaust outlets away from fresh air inlets and air-conditioning outlets;
● Where site conditions permit, install fresh air and exhaust outlets in every room.
■ Notes on Purification Performance
To achieve the desired purification performance in rooms served by a fresh air system, the following conditions must be met:
● The fresh air unit must have high purification efficiency, with a PM2.5 concentration of zero at the fresh air outlet;
● Supply sufficient clean fresh air to ensure the required ventilation rate;
● Ensure proper airflow distribution and sufficient distance between fresh air inlets and exhaust outlets;
● The fresh air volume must exceed the exhaust air volume to maintain slight positive pressure indoors and prevent surrounding air from entering the room;
● The building must be well sealed to prevent polluted outdoor air from infiltrating indoors;
● Central air-conditioning outlets must be treated so they do not blow large amounts of polluted air;
Relationship Between Fresh Air and Energy Consumption
A full fresh air system is an effective way to prevent cross-contamination and improve air quality. However, introducing fresh air can substantially increase air-conditioning energy consumption. As a result, many buildings do not use full fresh air ventilation, or deliberately reduce the fresh air supply. Efficient heat recovery technology makes full use of the energy in exhaust air and can reduce the air-conditioning load by 15~30%, effectively addressing the high energy consumption associated with fresh air.
Other Considerations
● When the temperature and humidity of the fresh air and exhaust air differ significantly, condensation may form on the surface of the aluminium alloy plate heat exchanger. Drainage of condensate must be considered in the design;
● Do not select a fresh air unit based on floor area alone. Required airflow also depends closely on the building’s function, occupancy density and air quality requirements, all of which must be carefully considered;
Smart Control Panel
I. Product Introduction
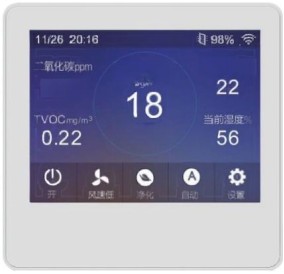
The smart LCD fresh air controller is an internet-connected smart controller that not only operates fresh air purification units but also monitors indoor air quality in real time. It measures PM2.5, TVOC, carbon dioxide, temperature, humidity and other air quality parameters, and intelligently links air quality readings with the fresh air purification unit. Data can also be transmitted to a server via RS485, WiFi and other methods, enabling monitoring through a mobile phone and supporting remote monitoring, linked control of fresh air purification equipment and smart home applications.
II. Product Features
2.1. Measures a wide range of parameters and displays indoor PM2.5, TVOC, carbon dioxide, temperature and humidity in real time.
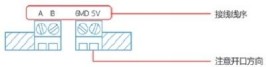
2.2. Product functions can be customised. Optional sensor modules are available for real-time monitoring of readings.
2.3. Monitors the remaining filter life for convenient replacement tracking.
2.4. Supports multiple communication methods, including RS585 and WiFi.
2.5. The controller connects directly to the fresh air purification unit, making wiring simple and convenient.
2.6. Supports remote monitoring via mobile APP and WEB, enabling intelligent internet-connected equipment.

III. Applications
3.1. The product is suitable for various indoor environments and can monitor different types of particulate and chemical pollution.
3.2. The product can be linked with various devices, such as fresh air equipment and air purification equipment, for automatic control.
3.3 The product can be customised to meet customer requirements and can control devices such as fan speed and valve operation. Air quality control can be added to standard control modes based on temperature, humidity and time, enabling intelligent, network-connected equipment.
V. Technical Specifications
Supply voltage: AC220V Resolution: 320*240
Data interface: RS-485 Installation size: standard 86 box
Product dimensions: 92mm*92mm*50mm
VI. Installation Method
Can be installed in an 86 box on a wall.
VII. Air Monitor Wiring Diagram
7.1. Controller wiring diagram, as shown below:
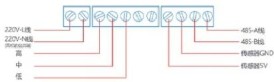
7.2. Connection of the expansion sensor module, as shown below:
VIII. Controller Operating Instructions
8.1. The controller buttons use capacitive sensing; touch them with a finger to activate their functions.
8.2. Power on/off:
When the unit is off, tap the screen. Once it lights up, tap again to turn the unit on;
When the unit is on, tap to turn it off. Users can set the screen-off energy-saving mode.
8.3. Fan Speed Adjustment
In manual mode, tap to adjust the fan speed across three levels.
8.4. Mode Switching
Tap the mode button to switch the unit between automatic, manual and sleep modes.
1. When a sensor module is connected, the controller automatically controls the unit based on current carbon dioxide and PM2.5 readings.
2. In manual mode, tap the fan speed button to switch between high, medium and low speeds.
3. In sleep mode, the fan operates at low speed to reduce noise and create a comfortable environment.
8.5. Settings
Tap the settings button to open the settings menu.
1. Date and time: Tap the date and time button to open the menu, then tap the fields to be changed and enter the required date and time.
2. Password
2.1. Tap the password button to open the password settings screen. The default password is 666666; the filter password can be changed.
2.2. The filter password allows the timer to be reset after filter replacement, making it easier for users to monitor filter usage and replace filters in advance.
3. Backlight: Tap the backlight settings button to open the screen
3.1. The backlight has three brightness levels: dim, medium and bright. Users can adjust it as needed.
3.2. When “Screen-off/on schedule enabled” is selected, users can set the screen-off and screen-on times.
3.3. Users can select “Turn screen off after one minute” as needed. When the screen is off, touch the panel to wake it and turn on the display.
4. Filter: The filter timer is preset by the manufacturer based on the filter service life. Once set, it should not be changed arbitrarily; otherwise, the remaining service life will be inaccurate. When the filter percentage approaches 0%, replace the unit’s filter and then tap the “Filter” button to restart the timer.
5. Network setup: Tap the “Network setup” button to connect the controller to the current or a specified WiFi network. Scan the QR code using a mobile phone to monitor and manage or operate the unit remotely in real time, enabling device connectivity.
6. Fresh air: Tap the “Fresh air” button to open the screen. Users can adjust the carbon dioxide setpoint. When automatic mode is selected and the reading falls within the set range, the unit can change operating speed according to the current environment.
7. Purification: Tap the “Purification” button to open the screen. Users can adjust the PM2.5 setpoint. When automatic mode is selected and the reading falls within the set range, the unit can change operating speed according to the current environment.
8. Reset: Resets all controller settings to the factory defaults.
Operating Principle Diagram: Compact Floor-Standing Fresh Air Unit
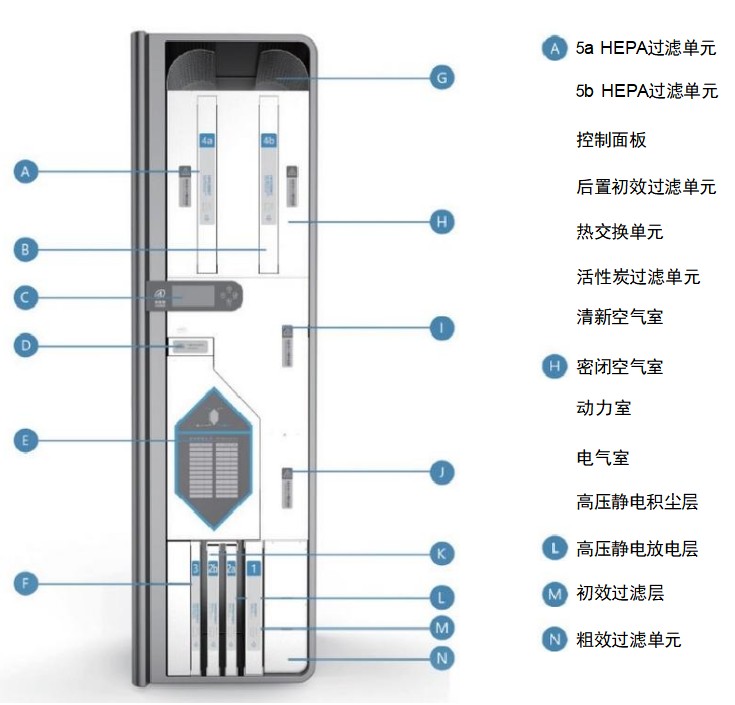
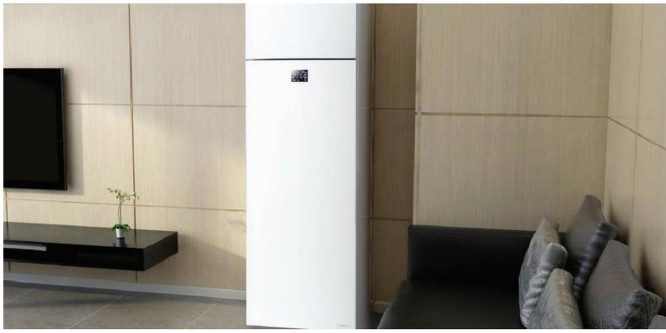
Product Advantages
■ High purification efficiency
- Three-stage purification using coarse filtration, activated carbon and high-efficiency filtration removes 99.9% of PM2.5
■ High heat recovery efficiency
Uses an aluminium alloy plate heat exchanger with a large heat transfer area and long service life. It can recover more than 70% of energy and reduce air-conditioning system energy consumption by 20~30%
■ Multifunctional
The digital LCD control panel provides up to eight useful functions
■ Quiet
A dual-motor system with high external static pressure and low noise, combined with an ultra-quiet unit design, ensures low-noise operation
■ Environmentally friendly
All consumables are made from non-toxic, harmless materials and do not generate toxic or harmful substances
■ Easy cleaning and maintenance
Low-level surface mounting makes the access door easy to open. Internal components can be removed for cleaning or replacement. The equipment and duct system remain clean and do not require frequent cleaning or maintenance
■ Low consumables cost
The medium-efficiency filter removes more than 90% of PM2.5, greatly reducing the load on the high-efficiency filter and doubling its service life. The electrostatic precipitator can be washed and reused regularly without replacement, making it easy to clean
■ Automated smart control
The unit uses a smart control system and AI control interface, with features such as dust monitoring, variable-frequency adjustment, airflow control based on carbon dioxide levels and APP remote control. This enables the equipment to operate efficiently and remain in an optimal condition, meeting comfort requirements while effectively reducing energy consumption
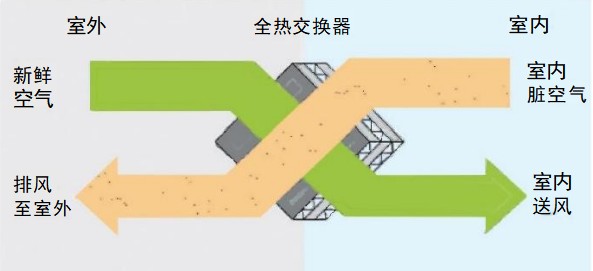
Operating Principle Diagram: Ceiling-Mounted Fresh Air Unit
Outdoor fresh air and indoor exhaust air differ in temperature and humidity. When they pass through the total heat exchanger in a cross-flow pattern, energy is exchanged.
Summer
Fresh air receives cooling from indoor exhaust air, lowering its temperature. It is also dried by the exhaust air, reducing its moisture content.
Winter
Fresh air receives heat from indoor exhaust air, raising its temperature while also gaining moisture.
Central Fresh Air System
Technical Parameters
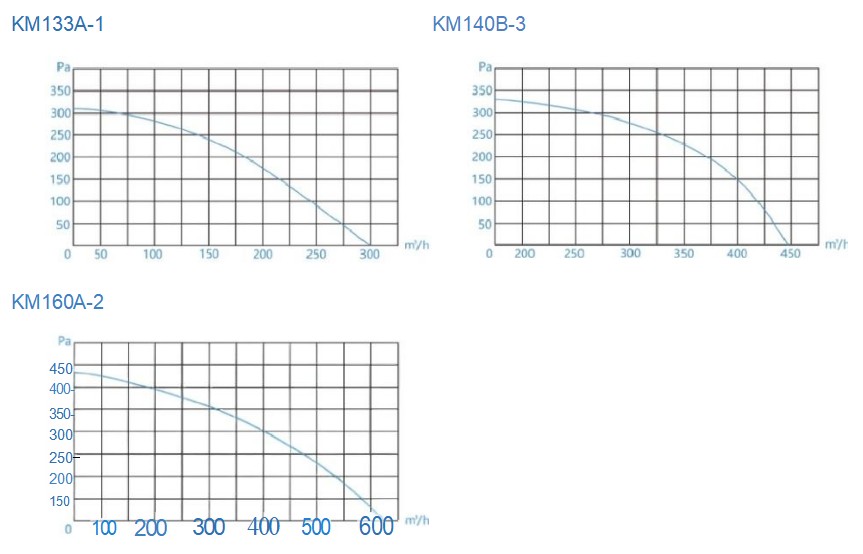
Air Pressure Curve
Important Notice
The product specifications shown in this document do not include normal manufacturing tolerances. Therefore, the actual product may not exactly match the specifications listed.
In addition, this product is tested and measured under strictly controlled conditions. Changes in environmental conditions may cause slight differences in performance.
Power supply: 220VAC/50 Hz Filter: All models in the range are equipped with H12 high-efficiency filters
Ambient temperature: Storage and transport 0-35℃ Installation method: Ceiling-mounted or wall-mounted
Operation -10-40℃
Fresh Air Product Series - Specifications for the Full Range
Product Dimensions
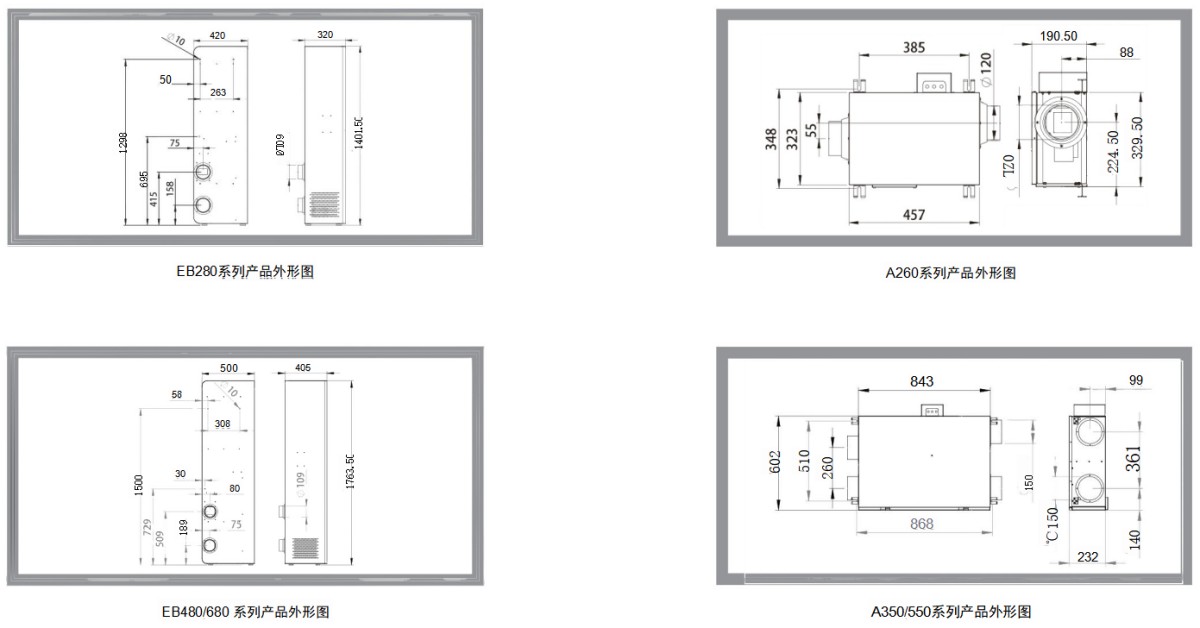
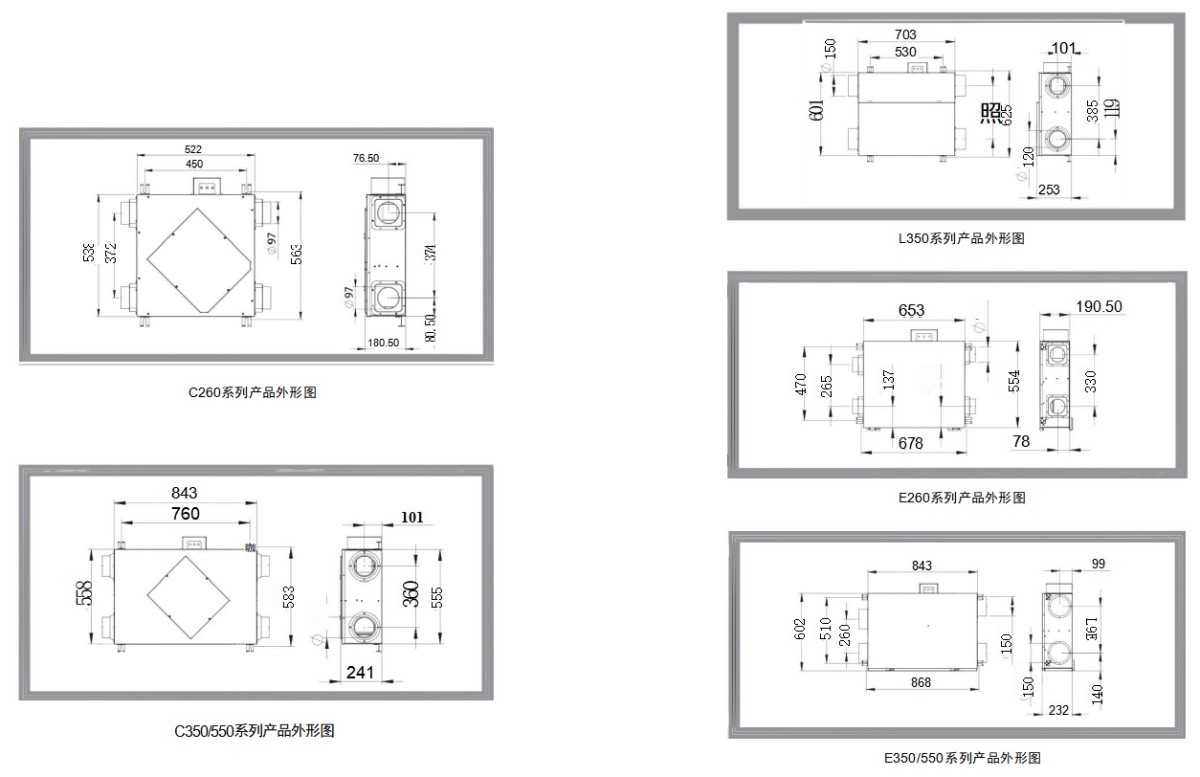
Installation Plan
Installation Detail Drawing
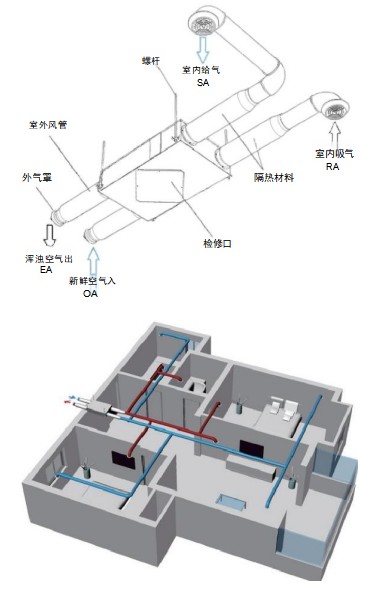
Important Notice
To ensure proper distribution of fresh air, the air resistance in the duct system must be checked by a professional designer. We strongly recommend contacting an authorised distributor or the after-sales installation department for professional technical support.
Duct design and installation must comply with HVAC standards. Keep intake and exhaust ducts as short as possible and minimise bends. This fresh air system is fully independent, and its ducts can be suspended above the ceiling. If a central air-conditioning system is installed, the central fresh air system can also be connected to its ductwork, introducing fresh air into the air-conditioning supply duct or to the central air-conditioning terminal to reduce duct installation work and increase supply air static pressure.
(Construction may proceed only after assessment and design by a professional. The company accepts no responsibility for damage to the central air-conditioning system caused by unauthorised installation.)
Airflow Balancing
Duct design and installation must comply with HVAC standards. Keep the intake and exhaust ducts as short as possible during design. Air pressure in the exhaust duct must remain balanced to create slight positive pressure in the room. Consult your local distributor or a professional installation department for specific duct system design.
Controls
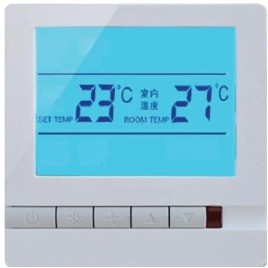
Wall-Mounted LCD Display Controller - T6617
The wall-mounted LCD display controller is the standard main controller and has the following functions:
·Power on/off
·Three-speed adjustment
·Room temperature and humidity display
Optional Controller
Wall-Mounted Smart LCD Display Controller - T6618
The required indoor fresh air volume depends on indoor air quality. PM2.5 dust, carbon dioxide, volatile organic compound (VOC) concentrations and humidity levels are all key factors in determining whether indoor ventilation is insufficient or excessive. This fresh air purification unit has an open network control interface that can connect to a smart home control system, providing users with a more comfortable indoor environment while maximising energy savings.
·The iCTRL control panel integrates PM2.5/PM10 laser sensors, a carbon dioxide sensor, a TVOC sensor, and temperature and humidity sensors. It accurately measures each indoor parameter.
·The operating mode of the fresh air unit can be adjusted automatically according to system settings or user settings.
·The controller has an integrated WiFi module and supports remote monitoring and control via a mobile APP, making the equipment easy to connect to the internet.
·The colour LCD panel provides clearer, more intuitive data display.
·The APP interface provides a wider range of data displays and user controls, enabling users to check air quality and make adjustments anytime, anywhere.
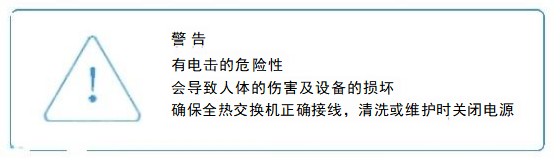
Installation
When installing this product...
▲ Read this manual carefully. Failure to follow the instructions may damage the product or cause injury.
▲ Check the product label to ensure it is suitable for your application.
▲ The installer must be a qualified and experienced technician.
▲ After installation, check the product’s operation using the steps provided in this manual.
Unpacking the total heat exchanger
Check the product’s condition. The total heat exchanger is fully assembled at the factory. Models supplied with ceiling-mounting accessories can be installed directly. Full installation also requires wiring and duct installation.
Main Unit Installation
Ceiling Installation
1. When selecting the unit’s suspension location, leave at least 15mm between the top of the unit and the ceiling.
2. Secure the expansion bolts to a solid ceiling.
3. Insert the expansion bolts through the mounting lug holes on the unit and secure them with hex nuts and washers.
4. Level the unit.
5. Provide a sufficiently large access opening in the ceiling near the unit for maintenance.
Equipment Positioning
-Select a suitable location for the fresh air unit. It can be installed in the ceiling space of a balcony, bathroom, dining room or equipment room.
-After determining the installation location, drill holes for the expansion bolts in the floor slab.
Positioning the Fresh Air Unit
-Insert the expansion bolts into the holes and tighten them slightly.
-Move the main unit into position, align the suspension lugs with the expansion bolts, fit the nuts and tighten them.
Drilling the Exterior Wall
-Use a suitable drill bit to make an opening at the specified location.
-The wall opening should be 3-5mm larger than the pipe diameter.
-The exterior opening should be lower than the interior opening. Angle the drill bit downward by 1-2° to prevent rainwater from entering.
Installing the Wall Sleeve
-Insert the fresh air and exhaust wall sleeves into the wall openings, then secure them with spray foam (mixed-air units have only a fresh air wall sleeve).
-The wall sleeves are extendable; adjust their length to suit the wall thickness.
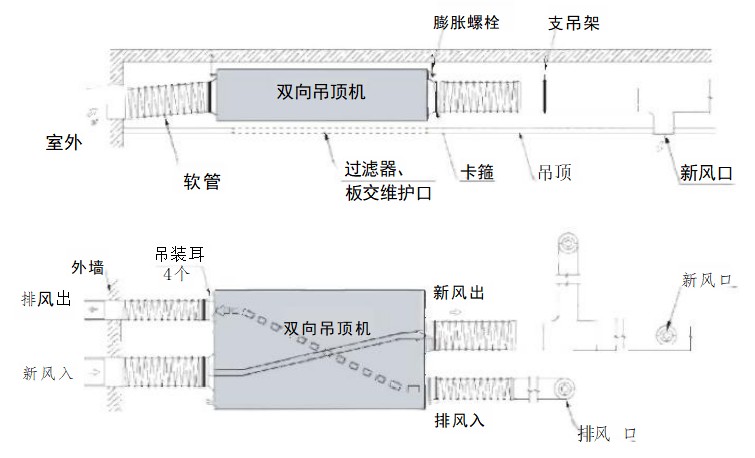
Duct Installation for Two-Way Ceiling-Mounted Units
-Connect the unit’s fresh air inlet and exhaust outlet to the wall sleeves using flexible ducts, securing the connections with clamps.
-Connect the main fresh air and exhaust ducts to the unit, securing them with clamps.
-Install indoor ducts and outlets according to the design, and attach a ribbon to the fresh air outlet.
-Install a support hanger every 2 metres to prevent duct vibration and deformation.
Duct Installation for Mixed-Air Units
-Connect the unit’s fresh air inlet to the wall sleeve using a flexible duct, securing the connection with a clamp.
-Connect the supply duct to the unit’s mixed-air outlet, securing it with a clamp.
-Connect the return air duct to the unit’s return air inlet, securing it with a clamp.
-Install indoor ducts and outlets according to the design, and attach a ribbon to the fresh air outlet.
-Install a support hanger every 2 metres to prevent duct vibration and deformation.
Powering On and Operation
-Connect the unit’s power cord to a 220V, three-pin power outlet.
-Run the unit continuously for more than 24 hours and check particulate levels at the air outlet and indoors.
Wiring
Main Controller - T6617 Wiring Diagram

Air Pressure Balancing
Air pressure balancing affects the performance of the entire system. The airflow at each outlet must be close to the designed value. An unbalanced system can cause the following problems:
·Fresh air may not reach certain areas, leaving dead zones
·Too much fresh air in some areas
·High air velocity can cause noise and discomfort
Follow these steps to balance the air pressure:
·Confirm that all duct system joints are sealed
·Ensure all system components are installed and operating correctly
·Fully open the supply air outlets
·Switch on the unit and set it to maximum fan speed
·Adjust the diffuser dampers to the designed airflow and use an anemometer to check the actual airflow (on applicable models)
·Adjust from the point farthest from the unit toward the nearest point, and from branch ducts to the main duct
Start-up and Operation
·Refer to the main controller manual
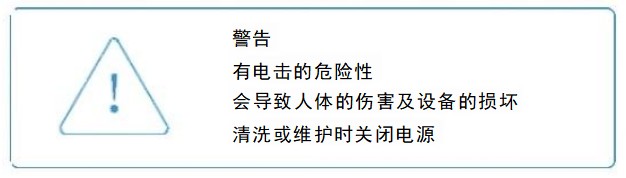
Cleaning and Maintenance
● Record electrostatic precipitator cleaning dates regularly and clean the collector at the specified intervals
● Record coarse and high-efficiency filter replacement dates regularly, and replace the filters at the specified intervals
● Record plate heat exchanger cleaning/replacement dates regularly. Clean the heat exchanger in floor-standing and direct-blow fresh air units once every 1-2 years. To clean it, remove the heat exchanger, place it in water, add an appropriate amount of detergent and soak for 10 minutes before scrubbing. Allow it to air-dry or dry it with a blower. Replace the heat exchanger in wall-mounted fresh air units every 2-3 years
● Clean the fan and unit casing once or twice a year. Wipe them with a towel.
● Regularly check and record particulate concentrations in rooms and at fresh air outlets. If particulate levels increase significantly, contact a GreeDe professional engineer for an on-site inspection and service
● Regularly check unit operation, including whether the unit runs steadily and whether there is any unusual noise. If there is a problem, contact a professional engineer for an on-site inspection and service
Remove the access panel fixing bolts and carefully open the maintenance door
Remove the filter to be replaced. Filter replacement intervals are as follows
*The IFD filter is supplied with E-series models
*As products are continually improved, our company reserves the right to change product performance and functions without prior notice
Frequently Asked Questions
Please provide the model, airflow, total/static pressure, installation orientation, air inlet and outlet configuration, material, insulation, motor voltage/frequency, control method, filter module, smoke control and fire protection requirements, quantity, and packaging requirements. Performance, dimensions, and certification information are subject to the confirmed product and order documents.